Oct 04, 2020 by DEVIZE - 0 Comments
New to buying beats online? Find out how in these instructional videos below.
Don’t forget new beats every Tuesday Night only at https://www.devizebeats.com/
Don’t forget new beats every Tuesday Night only at https://www.devizebeats.com/
Have you ever bought a beat online without knowing what user-rights you actually have? Can’t wrap your head around these different licensing options that producers offer? Or, maybe you’ve finally found that perfect beat after hours of searching and spent all night writing a potential hit song. Then, you go to the producer’s website only to find the following words; “This beat is SOLD!”
Let’s say you’ve been checking out beats on YouTube all night and finally found a beat you like…
Don’t even start writing a single word! 
First, visit the producer’s website to make sure the beat is still available.
You really don’t want to know how many times I had to disappoint a good artist by telling them that the beat they wanted to get is no longer available. Many times, they’d already written an entire song to it. If the record is really good, that sucks for both of us.
When you’re looking for beats on YouTube, you can not always tell from the video title or description whether the beat is still available or not. Visit the producer’s website instead.
Once a beat gets sold exclusively by a producer, they are no longer allowed to license it to other artists. It’s also not possible to buy the beat from the person who purchased the exclusive rights. The exclusive contract does not permit the purchaser to re-sell the instrumental in its original form and if not overlayed with lyrics.
Another reason why you would want to buy from the producer’s own website is to check if they’re trustworthy to do business with. Most producers will direct you to a third party website such as BeatStars, Soundee or Airbit where you can make a purchase and get the beat instantly delivered after checkout. That’s perfect!
But there are still some producers who use alternative ways to sell beats. For example, some ask you to make a payment first and then they’ll manually send you the files. In that case, always check if the producer is still active since this is a very old method of buying/selling beats online.
If you have doubts, just make sure you use PayPal when you’re buying beats online. You can always open up a claim if a producer is not sending you the beat(s) you have purchased.
Like I mentioned, I used to download crappy MP3 formatted tagged files. This is wrong!
MP3’s are low quality and you can really tell the difference when you send your song off for mixing and mastering. (Ask any audio engineer you know.)
Also, major labels and A&R’s are constantly looking for potential artists to sign. Even if you created a potential Billboard charting track, when the audio is bad, they fast forward to the next track in a blink of an eye.
Licenses that come with tracked out files will give you the best bang for your buck. These tracked out files are all the separate files of a beat and haven’t been mastered, limited or compressed.
Yes, these licenses are more expensive. If it’s not within your budget, go for the WAV license instead.
This is pretty obvious but still, I want to address one particular subject. You’re probably familiar with the licensing tables that producers have on their website. They tell you the difference between each license they offer.
Don’t be fooled – READ THE PDF LICENSE AGREEMENT!
Everyone who sets up some kind of a contract has small print added somewhere. Trust me (or better yet.. don’t trust me!) because it’s not going to be all up in your face while browsing through a producer’s website.
Always make sure you read through the license agreement before buying a beat online.
If you don’t know the difference between Exclusive and Non-Exclusive, here’s an article I wrote that will help you understand it better. It’s called “The Ultimate Guide to Online Beat Licensing”
There, I said it… But it’s true! Selling and buying beats online has become too damn easy. Make sure you know who you are dealing with.
Have you ever come across a producer who sells Exclusive Rights for $50 without providing the contract details?
Have you ever had a producer sliding in your DM’s trying to sell you an exclusive beat, then sends you a PayPal link to buy and promise to manually send you the beat after you paid?
Those are the kind of producers who are in it for the fast money. A lot of them (not everyone! ) have no idea how the business works. Most of them are just starting out. In all honesty, they can be dangerous people to be doing business with.
Why?
In my opinion, people who are driven by money and money only are the ones who can’t be trusted.
Whenever you’re doing business with an online producer, especially when it comes to exclusive rights, make sure you have all the paperwork reviewed before making a payment. Discuss all the details of the sale and make sure you get a signed copy from the producer once you’ve made the purchase.
This is not a strange thing to ask and if the producer is trustworthy he will do that for sure. But when he starts acting all weird about it, it’s in your best interest to get out as fast as you can.
Again, I’m not saying that this is typical for all producers who sell $50 exclusives of course! All I’m saying: Know who you are dealing with!
Let’s say you’ve found several beats from a single producer but your current budget only allows you to purchase one right now. You could save up some money and come back later to purchase the rest of them, sure.
Well, let me tell you this. Producers have Bulk Deals going on all the time. Like, buy 1 get 2 free for example.
It’s funny. I’ve had many occasions when artists bought 2 beats from my site while they could have gotten 4 instead for the same price. They just didn’t see the advertisement to add 2 more to their cart for free.
What if the producer doesn’t have a Bulk deal going on?
SEND AN E-MAIL!
Producers are ALWAYS in to make a deal. Just tell them that you found several beats that you wanna use but can’t afford to buy them all. Ask if he got any deals going on right now or if he’s willing to negotiate a bulk price.
100% guaranteed that you’ll be offered a good deal which allows you to buy several beats for a special price.
It does depend on how high the total price of your order will be. Producers are most likely to make a deal if the total amount that you are offering is anywhere above $50. Just make an offer he can’t refuse.
Try it and you’ll see that it really works.
These tips I gave you all came from my personal experiences as both an artist and producer. Again, selling and buying beats online has become super easy these days. You just have to know what you’re doing and understand a little about the basics before you start spending money with producers.
Recording vocals properly is the cornerstone of a good mix.
They tell the story and set the emotional tone. They tie the entire project together. The truth is, an amazing vocal will make or break your song.
But there’s lots of variables that get in the way of capturing a great take.
In this article, you’ll learn common recording mistakes that can ruin any vocal and how to avoid them.
Here’ 9 vocal recording mistakes to avoid:
Let’s dive in!
It’s easy to think that mixing has the biggest impact on the vocal. But in reality, your recording is far more important.
One of the most influential factors during the recording phase is your choice of room.
Recording in a home studio poses many challenges…
It’s easy to think that mixing has the biggest impact on the vocal. But in reality, your recording is far more important.
You probably don’t have access to a professional vocal booth. You only have access to what you have—maybe just a few rooms in your home:
It’s a mistake to simply pick the one that’s most convenient!
The room that an instrument is recorded in always changes the tone. This is ESPECIALLY true for vocals.
If your vocals are recorded in a bad room, it’s extremely obvious by the end of the mix.
Reverb pulls the vocals back in a mix. The more reverb an instrument has, the less it sounds present and “in your face.” It sounds farther away from the listener.
You want the singer to sound up-close and personal. Recording vocals in a very reverberant room will make that intimacy nearly impossible.
The room that an instrument is recorded in always changes the tone. This is ESPECIALLY true for vocals.
Room reflections can also cause compression and pitch correction to sound unnatural. It’ll make the vocals sound “fake,” like they were tacked on at the end of the mix.
So… what room should you pick?
Try to use a small-to-medium sized room with a lot of stuff in it. Specifically, with a lot of SOFT stuff like beds, couches, pillows, rugs and so on.
All of those items tend to absorb sound, making the room less reverberant and more neutral for getting the best vocal
You also want to avoid rooms with a lot of hard surfaces and windows. So your kitchen and bathroom are probably not the best places to record a vocal.
There’s a flip side to this: You want your room to be dead, but not TOO dead.
If you put so much absorption material in a room that ALL of the room sound is gone, your vocal will sound dull and muffled.
There is, in this case, too much of a good thing. Find a balance.
Contrary to popular belief, a closet is NOT a good room for recording vocals. That myth started because professional vocal booths tend to be small and secluded.
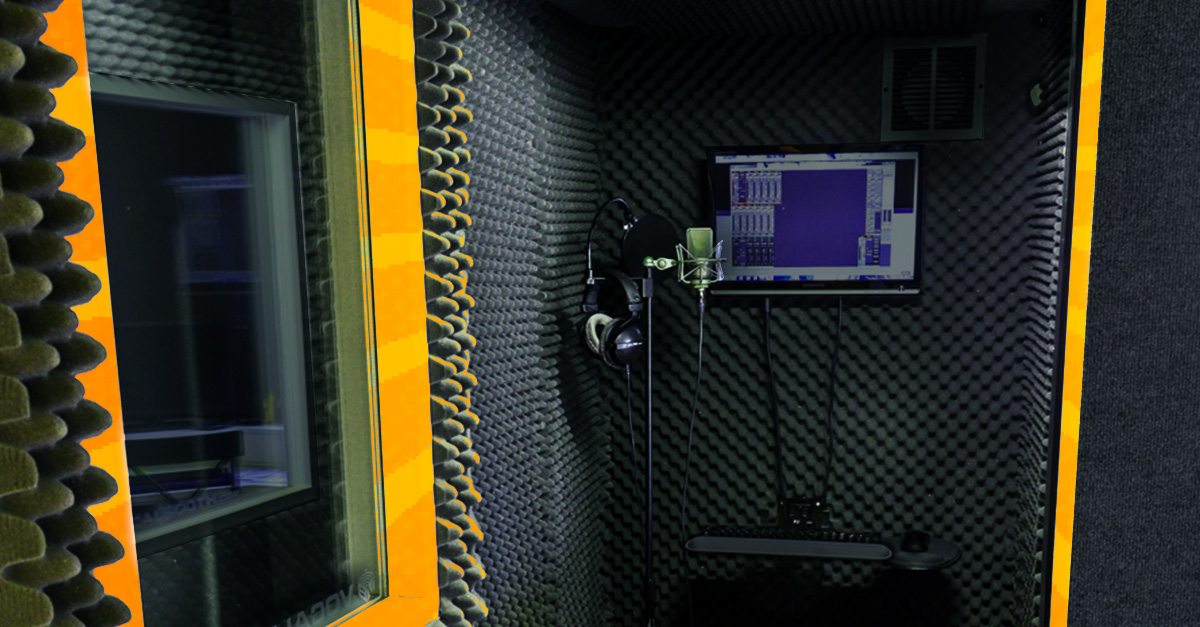
But the difference is that professional vocals booths are often covered in soundproofing fiberglass over 12 inches deep! Unless that’s how your closet was built, avoid it for recording vox.
No matter how many clothes are in them, a closet simply does not have enough absorption material to keep the room resonances out. Because of that, the reverb, though extremely short, will be extra loud in the microphone (especially once the voice is compressed).
So, think about this when you’re recording vocals. You’ll get a better sound with a well treated room!
Once you’ve found the right room, your job isn’t over. Far from it.
The next common mistake is mic positioning errors. It may seem small, but trust me—mic position is important to the tone!
Your 2 rules of thumb for mic placement are:
This will prevent you from recording any weird room resonances that occur outside the “sweet spot.”
So where’s the sweet spot? Here’s a simple chart to show you:

Stay out of the orange area and you’re good. You don’t want to be in the center of the room, and you don’t want to be close to the sides either.
Stay in the brown and you’ll be fine.
Hot tip: If you can, point the mic at one of the corners of the room. This increases the distance to the closest wall.
If you can, point the mic at one of the corners of the room. This increases the distance to the closest wall.
Condenser microphones are pretty sensitive. They can pick up stray sounds from all the way across the room.
So treating the space around them is essential!
If you have proper acoustic panels, use them to create a temporary vocal booth around the vocalist.
If you don’t have proper acoustic panels, use what you have on hand—Mattresses, duvets, and heavy curtains can work to create a makeshift booth.
Wondering if something will absorb enough sound? Try shouting at it and listen for how much sound it absorbs. The more the better.
Hot tip: If you can’t create the classic “triangle” vocal booth, then put something up behind the singer’s head. That’s the area that will affect the sound the most.
At this point, you’re starting to understand the main rule of recording vocals: EVERYTHING affects the tone. So take the time to get it right.
Each vocalist has a different tone to their voice. Some are deep and powerful, others are high and airy. There’s a thousand possibilities in between.
Match your microphone to your vocalist!
Match your microphone to your vocalist!
Every microphone is going to sound different. I’m not going to bore you with talk about the frequency curve of every single mic on the market.
But there are some general concepts that are important to know.
Small diaphragm condenser mics tend to sound bright and airy. The bass response is noticeably lower.
Large diaphragm condenser mics tend to sound clean and focused. The frequency response tends to be pretty balanced.
Dynamic mics tend to sound warmer and more aggressive. There’s less top end, which works perfectly for certain singers and genres.
The mic you pick will depend on what you’re looking for from your vocalist.
You could be looking for a mic that will accent their natural tone. For example, if you have a bright and airy singer and you want their tone to be even more obvious, then a small diaphragm condenser mic is perfect.
Other times you might want a mic that will balance their tone. If you feel like the bright and airy tone from your vocalist is too much, then a dynamic mic might be perfect to warm things up a bit.
No matter what, make sure you experiment! Set up 2 to 3 microphones and have the vocalist sing the chorus into each of them. Listen back to the tracks and see what you think.
If you only have the budget for one microphone, I recommend the Se 2200a II. It’s an affordable condenser microphone that’s well balanced for the price. If you need to start your microphone collection somewhere, it’s a great place to start.
Hot Tip: Change the mic out if your vocalist is going to be singing harmonies! The change in tone will help the main vocal to stick out more.
Let me be clear: Omnidirectional microphones can sound awesome. Especially for intimate, whispery vocals.
But for home recording, they have a fatal flaw: They pick up EVERYTHING in the room.
While cardioid microphones (like the Se 2200a C) pick up sound from one direction, An omnidirectional mic does exactly what the name says: It picks up all sound in the room equally.
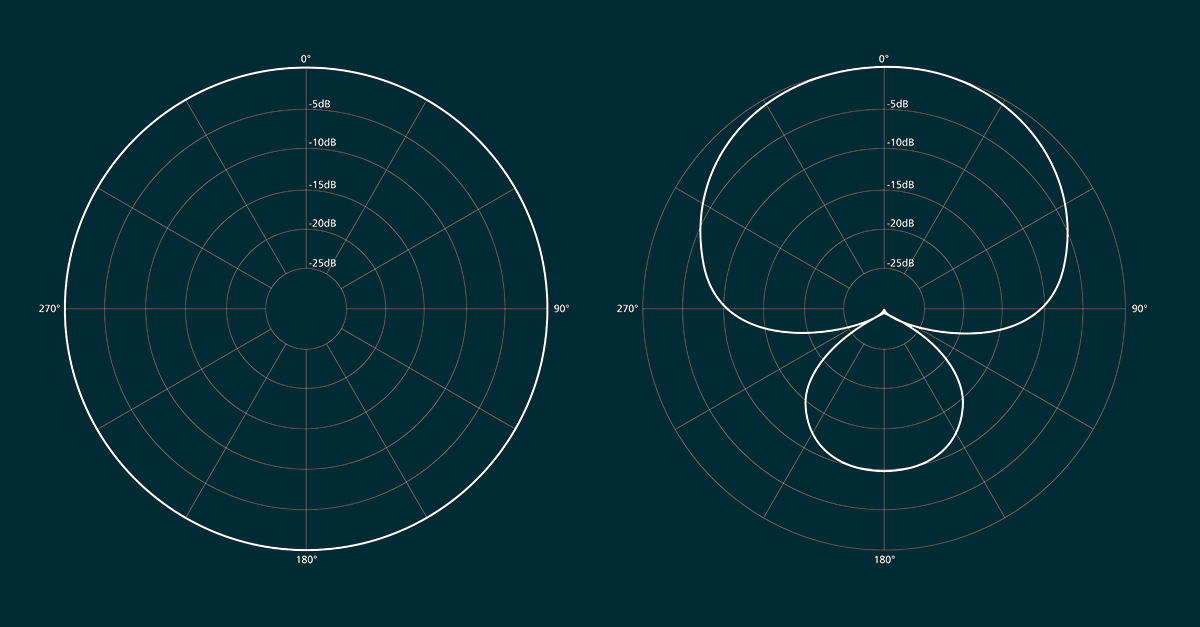
When you’re recording vocals in a professionally treated sound booth, using an omnidirectional mic is totally fine. There’s very little room sound for the microphone to pick up, so it’s irrelevant what direction it picks the sound up from.
But when you’re recording at home, in a bedroom or living room, omnidirectional mics make it nearly impossible to record a dry vocal.
So unless you have a well treated room, stay away from omnidirectional mics.
Once you’ve found exactly which room and mic to use, you’re almost done.
You already know where to put your mic in relation the room, but where do you put it in relation to the singer?
These three placement factors can change the tone of your microphone:
If you’re using a condenser mic, the distance between the mic and the singer will have the greatest effect on the tone because of the proximity effect.
The proximity effect is a phenomenon where the closer you get to the microphone, the boomier your vocals become:
A good starting place is to set the singer 6 inches away from the mic, and then move them forward or backward to get the tone you’re looking for.
Hot tip: Don’t put your vocalist closer than 5 inches away. Things can get too muddy real fast.
However, for dynamic mics a good place to start is 2 inches away. They are designed to be used this way. You can move forward and back from there.
Height is another factor in the tone you get from your mic. When a mic is at lip level, it’s at your “default” height, so to say.
When you lower the microphone, you’re increasing the low end of the voice. The closer you get to the chest, the more prominent the low-end.

The opposite is true as well – when you raise the microphone, the top end is accentuated.
Make sure the vocalist looks straight ahead when singing, otherwise they’ll put unnecessary stress on their vocal chords!
Finally, the last factor is the axis of the microphone.
Pointing the microphone at the singer is standard, of course. But when you rotate the mic, you’re reducing the bass from your singer. You’re also reducing plosives.
This is a great thing to try for singers with heavy P’s and S’s. Try moving the mic 20 degrees to the left and right and see what sounds best.
If you tweak these three variables accordingly, you should get the tone you’re looking for before you ever reach for an EQ!
This one is easy to overlook…
In the age of digital, the recording levels you set don’t matter nearly as much as they did back 60’s and 70’s.
But that DOESN’T mean they don’t matter at all!
In the age of digital, the recording levels you set don’t matter nearly as much as they did back 60’s and 70’s. But that DOESN’T mean they don’t matter at all!
When you’re setting levels, try to maintain 10dB of headroom.
Without getting into the technical details, the digital sweet spot is basically an average level of -18dBFS. That’s where most plugins are going to sound best.
When setting your levels, try to get an average of -18dBFS. You should be peaking around -10dBFS. Make sure you’re definitely not peaking higher than -6dBFS.
This keeps your levels low enough that you won’t accidentally clip (which means you’d have to re-record the part), but also avoid recording too quiet either.
Make sure you’re recording several takes when you record a vocalist.
Sometimes you’re working with a singer that you think is so good that one take is enough. You would never edit it! It was perfect!
And then, inevitably, you start to mix, and… oh. There’s out of tune notes. There are spitty words. Some phrases are out of time. Yikes!
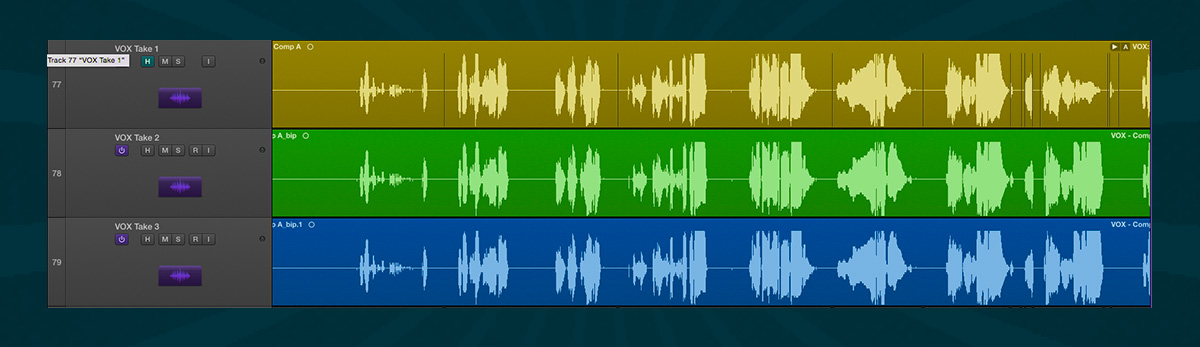
Make sure you have enough content to work with! You need to comp your vocals to create the best possible version for your song. It’s better to have too many takes rather than not enough.
Sometimes the singer won’t know when they’re doing something wrong. Gently coach them towards a better performance, but be wary of introducing self-doubt. You’re there to help, not to hurt.
Rule of thumb: Make sure to record a minimum of three takes from the singer. Even if the first take is a banger!
I always find something wrong later. And I always thank myself.
The voice is something we ALL have. We use it share our thoughts, our hopes, and our fears.
That’s why confidence is so important to a singer. They have to feel the emotion and KNOW they sound good.
When you’re recording vocals, you need to wear a few extra hats. You’re not just the engineer or producer anymore. You’re the coach, the therapist, and the cheerleader.
You have to do your best to nurture their best performance!
Here’s a few things to try:
Do these things and you’ll get a quality performance.
Recording vocals is an art, for sure. There are so many variables to consider!
But the more you practice, the better results you’ll get—Avoiding these 9 mistakes will help you get there faster.
There are several reasons for seeking out the best microphones, but as you’re here with us at MusicRadar, we’re assuming you want a top microphone for recording musical instruments, vocals or even a cheeky podcast. Though for the latter, we’d also recommend you check out our more dedicated guide to the best podcasting microphones. Either way, if its mics you want, we’ve got you covered – after all, it’s perfectly respectable to argue that there’s no bit of studio kit more important.
Investing in the best microphones you can afford early on when putting together your home studio, or pro studio, for that matter, is a wise investment, as a poor quality mic will quickly lead to frustrating recording sessions. You need a recording microphone capable of accurately capturing a quality audio signal – that’s a basic for any record producer or musician. But, as we outline below, not all recording mics are created equal.
In our expert guide to the best microphones for recording, we’ll explain the key differences to look out for choosing among the different recording mics available, and we’ll help you gain a clear idea of which type of mic suits which use. The microphones we’ve chosen sit across a variety of budgets or ability levels, and we’ll happily put our name to any microphone that has made this list.
So read on to discover our top choices for the best microphones for recording musical instruments, vocals and podcasts, and discover which ones are available to buy right now to add to your recording studio setup. If you’re looking for more cool kit recommendations, also take a look at our pro guides to the best studio monitors, as well sleek studio monitor stands, plus the best studio desks for neater storage of your gear.
Each of the microphones we’ve listed below will suit a certain use perfectly, whether that’s accurately recording the microscopic details of a vintage acoustic guitar or grand piano, or embellishing the sound of a great vocal performance. As such, it’s difficult to choose an overall ‘best in class’. Instead, we’ve highlighted a couple of high performers for your consideration.
The
Overall, however, the best microphone for recording is the one that achieves what you want it to achieve. Invest in something decent as soon as you can and you’ll reap the benefits of a higher quality recording microphone for years to come.
As with any piece of studio gear, the first question you need to ask yourself is, ‘How will I be using this?’ This question is crucial for a number of reasons. Each of the models featured in our best microphones guide naturally has its own strengths and weaknesses. Some work wonders for recording vocals, yet wouldn’t last five minutes on a sweaty stage. Others could survive a lot of wear and tear, but wouldn’t capture all of the nuances of a symphony orchestra.
Fundamentally, recording microphones fall into one of a small number of categories, with the two most common mics being dynamic and condenser. Dynamic microphones are perfect for performance, thanks to their inherent robustness and durability. This is down to their construction, with few moving parts to go wrong.
Dynamic microphones are ideal for stages, and are often seen in the hands of singers, adjacent to kick drums or propped up against guitar amplifier cabinets. Often, they’ll feature a ‘cardioid’ pickup pattern, which takes audio from a single axis, i.e. the front or side of the mic. This enables them to focus on a singer’s voice, for example, while also rejecting signals from other angles.
Condenser microphones, on the other hand, can be mostly split into two distinct camps. Firstly, large diaphragm condenser mics bring flavour and colour to a sound, and are perfect for vocals, speech and acoustic instruments. Small diaphragm condensers, on the other hand, are superb choices for tonal accuracy, and produce a more consistent result across the frequency spectrum.
You’ll see small diaphragm condensers used on cymbals, or as overhead or ambient mics to fill out an overall mix, for example. Condensers can offer a range of pickup patterns, from cardioid through to omnidirectional.
Ultimately, the best microphone for you will be dictated by a number of factors, including price, needs and situation. Let’s examine these top recording microphones now, so you can get started on your latest project.

As a condenser mic, the C636 is inherently more complex than its dynamic siblings, a complexity that comes at a cost in both R&D and production. Issues with feedback rejection and handling noise have to be balanced against tradeoffs in sound quality.
Behind the simple black exterior and lightness in hand, the C636 boasts serious design chops to give it the ‘Master Reference’ moniker, but is it deserved? In short, yes. The sound is clear and full, far more linear and ‘real’ than its dynamic mic counterparts.
The high frequency range is present and well defined, without the harsh hype and phase-shift peakiness that some (cheaper) condenser mics either display or attempt to mask with an overall HF pull-down.
Read our full AKG C636 review
Although visually similar to Lewitt Audio’s LCT 640, its new LCT 640 TS sports a twin diaphragm capsule and incorporates Lewitt’s integrated capsule matching system. The TS stands for Twin System: it works either in regular multipattern mic mode, or in dual mode, providing independent access to both diaphragm outputs. This allows adjustment of the pickup pattern after recording and also opens up some stereo recording options.
In dual mode the second diaphragm output is accessed via a miniature three-pin connector on the side of body, and in the carry case there’s a mini three-pin XLR breakout cable as well as accessories such as foam windshield, suspension cradle, mic pouch and a rather nifty magnetic pop shield. All told, it’s a well put together and stylish package.
Read our full Lewitt LCT 640 TS review
The Aston Origin may be competitively priced, but it possesses a degree of originality that is uncommon in this range. The Origin is a fixed pattern (cardioid) condenser and is the smaller of Aston’s two mics: the larger Spirit is a multi-pattern condenser with an extra 10dB of pad available. There are two switches on the stainless steel casing: 10dB pad and 80Hz low-cut filter.
The XLR connection is on the underside of the mic, as is a mic stand mounting socket (5/8-inch with a 3/8-inch adaptor included). This latter feature means there’s no need for a mic clip, though this does limit angle choices to the capabilities of the stand. The wave-shaped outer spring/mesh acts as a shock absorber for the capsule, and behind it sits a stainless steel wire mesh shielding.
Read our full Aston Microphones Origin review
Rode’s original NT1 was released around 20 years ago, followed by the NT1A a few years later. Now the company has gone back to the old name with a recently-released NT1 model that looks very similar to the NT1A but has actually been completely redesigned from the ground up – the only component in common with the NT1A being the mesh grille.
So, what does that redesign involve? First up there’s the new HF6 capsule, designed to feature a sound signature similar to vintage favourites but exhibiting extremely low noise. Then there’s the fact that the transducer is suspended inside the microphone using Rycote’s Lyre system, which should minimise external vibrations. Rode also claims that the NT1 is the world’s quietest 1-inch cardioid condenser due to the high-grade electronics keeping the self-noise level down to 4.5dBA.
Read our full Rode NT1 review
With everything plugged up, the first thing that’s obvious with the Aria is just how natural it sounds. There’s definitely a slight presence lift, but this is in the upper mids rather than right into sibilant territory. Beyond this there’s no high frequency hyping, or the brittleness that plagues mics of that ilk. So, one’s attention is drawn to the lows and low mids. These feel solid and although there is a small proximity effect, it’s not at all overbearing.
In use we feel the cardioid polar pattern is pretty broad both in horizontal and vertical directions. So the sweet spot is large, which is particularly useful for vocals and acoustic guitars. On vocals the Aria delivers a faithful sound, and when you dig in with more forceful delivery it responds very well. With acoustic guitar it’s easy to capture a non-boomy sound, and once again the non-hyped sound is great. The smooth response also lends itself to complex sounds such as guitar amp, strings and percussion.
Read our full Sontronics Aria review
Classic large capsule condenser microphones are without a doubt amongst the most sought-after and expensive items on anyone’s wish list. With an original Neumann U47 commanding up to $10,000, most of these mics are out of reach for the average studio owner, and certainly only possible for a tiny minority of home studios. So in theory, if you can emulate them with software then you should be on to a winner.
There have been a few plugs over the years which have claimed to give one mic the character of another but, given the limitations of the original mic, coupled with any number of mic pres that could have been used, plus the quality of the interface that recorded it, most of them have been pretty disappointing. Slate Digital have taken that idea and built a complete system which removes as many of those variables as possible.
What you get with the VMS is a high-quality, large capsule condenser mic, a dedicated ‘ultra linear’ mic pre and a plug-in which contains the modelled mics. The only variable is that you have to use your own A/D converter to get it into your DAW.
Read our full Slate Digital VMS review
With a new large diaphragm condenser mic there’s rarely anything unusual to discuss. After all, the focus is typically on the general frequency response, pick up pattern, build quality and sound. Audio Technica’s AT5040 ticks all the boxes of a typical high end phantom powered condenser mic with its discrete component design, low noise, high SPL handling and decent shock mount. Look closer, however, and you will find some special touches. The noise figure is exceptional and the quick release cradle beautifully designed (more later).
Also worth mentioning is the advanced internal capsule decoupling mechanism and the fact that it’s 100 percent hand built and inspected. The really big deal here – bigger than that whopping price tag – is the capsule: a four-part rectangular design delivering over ten square cms of surface area (roughly twice that of a one inch capsule). Put into perspective, a circular design with roughly the same area would have a diameter of 3.6cm.
Read our full Audio Technica AT5040 review
Like many large capsule condensers, omni mode on the sE2200a II is unlikely to be this mic’s forte, and the MkII’s response shows a noticeable dip (6dB) around the 5kHz mark. However, in use this wasn’t that obvious, and is possibly compensated slightly by the gentle boost above 7kHz. Either way, both patterns are useful inclusions, and save you the trouble of buying or setting up another mic, should you want to try out different patterns.
Overall, sE’s upgrade is a success, and combined with the multi-pattern option, the 2200a MkII is more desirable than ever. OK, the multi-pattern capability has pushed up the price a bit, but there’s always the fixed cardioid version if your budget’s tight.
Read our full sE Electronics sE2200a II review
As one of the best-respected names in microphones we were expecting good things from the Neumann TLM 102. This large diaphragm condenser promises superlative performance for vocals, and it does not disappoint. Offering crystal clear reproduction across the frequency range, with a nice bump around the 6 kHz mark, the TLM 102 is a specialist mic which will do wonders for your mixes.
That’s not to say it can’t do other applications though. It features a relatively high sound pressure threshold, so recording loud sources like drums and guitar amplifiers isn’t out of the question. All told this is an ideal investment for anyone looking to upgrade their recording gear and take their tracks to a new level.
The AE2300 is a broad-application high-SPL cardioid design, so should be ideal for percussion, drums, guitar amps and brass. It’s also pretty compact (less then 10cm long), so is perfect for discrete use in a live environment. The weighty brass casing and top grille feel robust, and the screw-tight rubberised clip should see off any wandering drum sticks while providing some mechanical isolation.
Overall, it’s a beautifully designed and manufactured mic. The proprietary double-dome diaphragm improves high-frequency and transient response. The off-axis frequency response is also reasonably linear up to 120 degrees, and not bad even at 180 degrees off-axis, which could certainly be beneficial when setting up a multi-miked drum kit.
Read our full Audio-Technica AE2300 review
The Solo is a well-weighted, solid microphone; light hand-held mics suck. The grille has a flat front which we much prefer to the bulbous type: it not only gives a more consistent distance guide when up close, it is also less likely to knock your front teeth out in a rowdy club gig.
The output impedance is higher than the average dynamic mic, and this is reflected in the healthy level at the preamp. This bodes well for controlling noise and feedback in live event gain staging, as well as studio usage. A beefy output is useless if the sound doesn’t pull its weight, which in this case it does.
Read our full Sontronics Solo review
Electronically, the NTR is active, running from 48V phantom power and has a built-in transformer that offers a high output so that the mic is not so finickity about preamp requirements as other ribbon mics and can, a fact borne out by our tests, be used with a wide range of preamps without having to turn the gain up to noise-generating levels.
Internal shock mounting results in there being no need for an external suspension cradle, which helps with placement and, even though this is quite a heavy mic, the included compact mount which attaches to its base works great at holding it at any angle on a mic stand with little pressure needed to firm it up.
On a variety of sound sources we found the mic to deliver a very natural representation of whatever was put in front of it with plenty of low-end and a clear top with a natural roll off, rather than the often overdone brightness designed into some condensers.
Read our full Rode NTR review
Not every budget can stretch to pro-level prices, yet the burst in popularity of streaming and podcasting has seen a surge in demand for decent quality, simple bus-powered microphones. There are plenty of great options on the market now, but we’ve opted for the IK Multimedia iRig Mic Studio on account of its simple setup, decent sound and access to a suite of apps for recording and production.
The iRig Mic Studio is equally at home on a portable device as a laptop or computer, and the price-to-performance balance makes this a very attractive option for anyone on a budget looking to get into recording.
https://www.musicradar.com/news/the-best-microphones-for-recording
My Official Spring Splendor Drum Kit is Now Available at ModernProducers.com

$14.95. 100 Wav Files Including Kicks,Snares, Hats, Perc etc
What can I say? I forbid to be 40, I am dreading it but its here. I have reduced my fulltime sales job of 5 days to 4 days, to focus more on my music, my craft, my true passion. I think as you age you become what you desire, things finally fall into place & you know which path you are gonna take. Enjoying life becomes more important than working for a life & sacrifices need to be made, we could die tomorrow of corona afterall 🙂
This year I think my focus will be on networking alot more, delving into different genres, hitting more angles, more music ..more unique music. I cannot stand the norm, the main, there maybe influences in my work at times but I will not conform to the generic. More talk soon
Most of my favourite music isn’t even Hip Hop related. I draw most of my inspiration from late night random vids on RAGE – Australian music show. Catchy, Creative, Mesmerizing Music.
This is a valuable production topic, and one that is sometimes overlooked by new producers in the mixing process: speaker placement and room acoustics.
Just to be clear here: A proper understanding of room and recording acoustics can be the subject of years of study, as a whole science—the science of acoustical engineering—is devoted to its application. My goal in this section is to give you a good general understanding of how room acoustics relate to your perception of a mix and some solid steps you can take to improve the fidelity of the perception of your sound through proper placement of your monitors (assuming you are using near-field studio monitors).
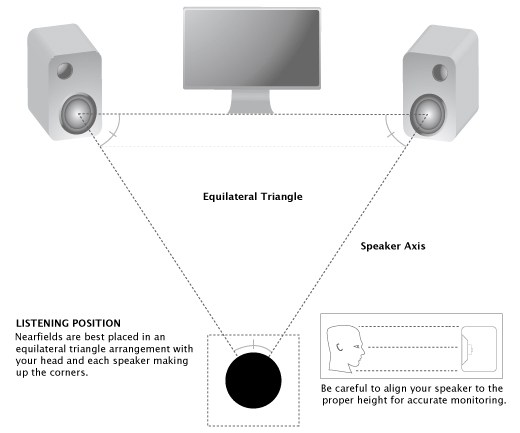
The first and probably most common piece of advice you will hear: Make sure your studio monitors are at an equal distance (generally 3-5 feet) from themselves and from you. This means that your studio monitors should form an equilateral triangle from your left monitor, right monitor, and your head. This will ensure that you are receiving the sound from both monitors as the waves converge, giving you a clearer picture of the sound. Your monitors should also be angled slightly toward you.
Poor triangulation and placement will result in an uneven perception of the the stereo image, and may cause you to make poor panning, stereo and other mixing decisions based upon that flawed perception. I would also suggest putting your studio monitors on individual stands to minimize any vibrational effect they might have on the desk or workstation you are using; this is especially important when mixing bass frequencies, as the extra rumble from the desk could be erroneously perceived as extraneous bass needing to be cut from the mix! This also goes without saying: Make sure your monitors are at the same height level!
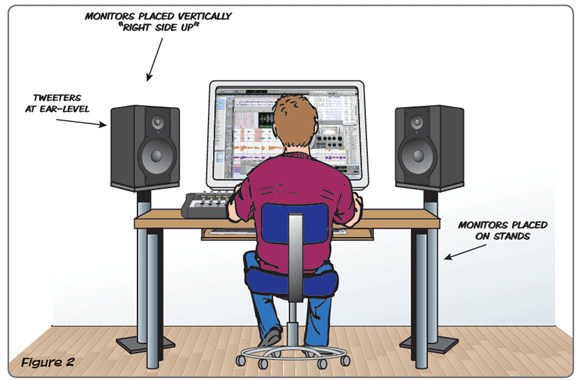
Studio monitors should also be placed so the tweeters of the monitors are at ear-level. This is because high frequencies—those specifically produced by the tweeter unit—tend to be very directional in nature. Unlike bass frequencies which are omni-directional and can be perceived well without being specifically aimed at the user, high-end frequency sounds are better perceived when they are aimed directly at the listener. By aiming the tweeter directly at the height of your ears, you are ensuring the best perception of your mix possible. 
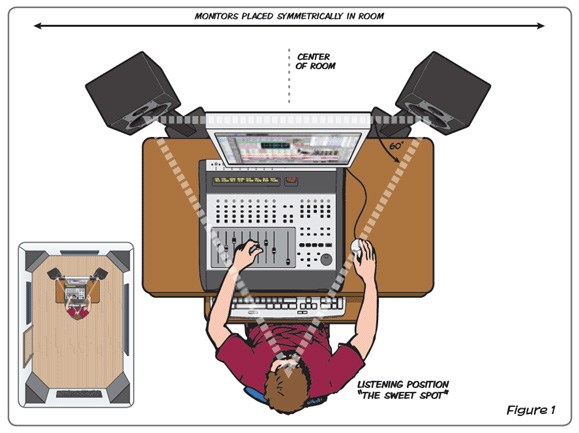
The placement of your workstation and monitors within a room itself is also an important factor. Ideally, your workstation should be placed in the center of the room, approximately one-third the length of the room from the wall your station faces (the image below does a great job of demonstrating this positioning). The reason you want these placement parameters is because of the nature of the way sound waves bounce off of objects. Centering studio monitors off to the side of the room will cause sounds to bounce unevenly off the walls of the room, producing a warped and unbalanced sound. For this reason, at all costs, avoid placing your workstation in the corner of a room. Placing the studio monitors away from the wall you are facing will also prevent the buildup of bass frequencies and lead to a clearer, more accurate perception of the low end of your mix. Also avoid placing your workstation too close to the wall behind you: This orientation can cause reflected sound waves to bounce back from the rear wall and distort your perception.

All the above placement techniques will definitely help you to improve the quality of the room acoustics you are working with and give will you a more accurate perception of the mix coming from your monitors. Keep in mind, these are meant to be general guidelines which will help you understand acoustics and should not be taken religiously. Feel free to modify, explore and experiment with different types of setups and speaker orientations in order to produce the kind of sound you believe most accurately represents your mix. There is also no perfect room, especially in relation to home and project studios, but the guidelines outlined in this brief article are solid basics which should give you a decent understanding of how to position your monitors.