Positioning your monitors and listening position is crucial to creating an accurate mixing environment. The first step is to pick the best possible arrangement for your workstation and speakers.
In this article, we will take you through a few best practices. Like all rules, there are exceptions and variations. When followed, these should provide you with a good starting point for your mixing environment. Once you have that set up, feel free to make changes as needed. Remember that even best practices will not work in every mix environment. Your goal is to find the best configuration for your room and your needs.
Set up your desk so that your speakers are away from walls and corners.
 Make sure that your speakers can be placed away from walls. Eight to twelve inches will be adequate to prevent sound waves from hitting the wall and reflecting back to you, causing phase cancellation and other potentially harmful acoustic interactions. This might not always be possible, and there are some ways to mitigate cramped mixing spaces. (We’ll get to those in a minute; remember, these are just best practices.)
An added bonus of putting some distance between your speakers and the walls is that it gives you easy access to the back of your rig, which is never a bad thing.
Whenever possible, avoid setting up you desk in a corner; this will help prevent the bass buildups that naturally occur when two reflective surfaces meet.
Verify studio monitor orientation
 Many studio monitors shouldn’t be placed horizontally, as horizontal placement can degrade the stereo image, so it’s important to read the monitors’ documentation. Some monitors, like the PreSonus Eris E5, E44, and E66, can be placed horizontally or vertically. When orienting your studio monitors horizontally, they should form a mirror image of each other, with the tweeters on the outside.
This is also true for MTM monitors like the Eris E44 and E66 when placed vertically. That is, they should form a mirror image of each other, with the tweeters on the outside.
Whether or not the manufacturer recommends horizontal or vertical placement, you should always feel free to experiment. You may find that you prefer the way a different orientation sounds in your space, even if it’s not the one the manufacturer recommends.
Your speakers should form an equilateral triangle with your listening position.
 Whenever people talk about listening to speaker systems, they talk about the “sweet spot.” As mentioned earlier, this is the middle position between the two sides of a stereo system, where the speakers overlap, and it is where the stereo image will be the best.
Creating the sweet spot is relatively easy. Simply angle, or “toe-in,” each speaker so that the tweeters form an equilateral triangle with your head—that is, the speakers are the same distance from each other as they are from you.
The high-frequency driver should be the same height as your ears.
 High-frequency content is much more directional than low frequency content. Because of this, you can more accurately hear what is happening if the high frequencies are directed at your ear. Once you have created the sweet spot, sit down and make sure that your ears are level with the center of tweeter.
In some cases, especially with large speakers, placing the speakers vertically results in the tweeter being aimed too far above your ears. One way to solve this is to simply invert both monitor speakers so that the tweeters are on the bottom. It may look unusual but it works.
Situate your mix position symmetrically.
 The center of a wall provides a more balanced listening position. Place your speakers so that they are the same distance from the sides of the room. That is, if your left speaker is six feet from the wall to the left and two feet from the wall behind, your right speaker should be six feet from the wall to the right and two feet from the wall behind.
By centering your mix position, your monitor system will provide more reliable low-frequency intelligibility. In a rectangular room, it is best to set up along one of the long walls, especially in a smaller room. This will minimize problems caused by side wall reflections.
The speakers should be a different distance from the back wall than from the walls on either side.
 Just like it’s not a good idea to set up your mix position in a corner, it’s not a good idea to create a corner with your mix position. Make sure the distance from the speaker to the wall behind it is different than the distance from the side wall closest to it. For example, if your left speaker is six feet from the wall to its left, it shouldn’t also be six feet from the wall behind it.
Use the tools your monitors give you to overcome problems in your room.
 Ideally, your mix space should be large enough to allow you to set up your listening position well away from walls and corners. But this is not always possible, especially if your mix environment also doubles as a bedroom, den, or family room. Luckily, some studio monitors, like all PreSonus full-range studio monitors, provide onboard controls to help mitigate this.
When a monitor is placed close to a wall, or in a corner, the low frequencies tend to be emphasized more than if the monitor is far from any room boundary; this effect is called “boundary bass boost.” It is typically most pronounced if the monitor is in a corner and is less pronounced (but still present) if the monitor is near one wall.
 Acoustic Space controls, like those on every professional PreSonus studio monitor, cut all frequencies below a specific frequency by a fixed amount, which can help with this problem. If you find that your monitors sound “muddy,” or if your mixes lack low end everywhere but your mix environment, try these controls.
Monitor stands are worth the investment
Placing your speakers directly on your desk can limit their ability to produce clear, balanced audio because the sound waves coming from them are bouncing off a hard, reflective surface (your desktop) before they reach your ears. Studio monitors also transmit their vibrations to any surface they are resting on, including your desk. This can lead to loose screws rattling or other less-obvious noises that can muddy up your mix. Furthermore, your desk will most likely have a resonant frequency or two, so as you turn up your monitors, the desk itself will boost particular frequencies by sympathetically resonating with the vibrations of your monitors.
Desktop placement also puts most speakers below ear level, which is not ideal. Monitor stands can raise the speakers closer to ear level and help prevent early reflections from interfering with your listening environment.
 However, if you’re working in a tight space (or on a tight budget), and don’t have the square footage (or spare change) for conventional speaker stands, your speakers may need to be placed on your desk. This is where isolation pads, like the PreSonus ISPD-4, come in. Generally, isolation pads are relatively cost-effective foam or rubber stands for your monitors that help to mitigate the vibrations and sympathetic resonance that can occur whenever a speaker is resting on a hard surface. Monitor pads solve this by decoupling the speakers from the desk. The monitor’s vibrations travel harmlessly into a flexible, absorbent material, instead of through and off your desk.
As an added bonus: most monitor pads, including the PreSonus ISPD-4, provide some method of adjusting your monitors’ vertical angle. This is ideal if you’re placing them on a surface that is higher than your seated mix position. This can also be useful when placing your monitors on stands. Whether your monitors are placed on stands or on your desk, be sure to follow the best practices discussed earlier when placing them in your mix environment.
Find the right spot for your subwoofer
Whether you add a subwoofer to your existing monitoring system, or you purchase a complete 2.1 system, it’s a good idea to dial in your full-range system first, especially if you’re starting from scratch. This will make it easier to identify and fix problems before you get too many components in the mix. Once you have your full-range monitors placed and calibrated and your room acoustics tamed, adding a sub will be an easier proposition.
The goal of proper subwoofer placement is to set up your system so that your subwoofer acts as a natural extension of your full-range monitors without boosting the overall bass response of your room or exaggerating any one frequency or frequency range. Because low frequencies are not directional—that is, humans cannot perceive the direction from which low frequencies are coming— you aren’t limited to placing it facing the mix position.
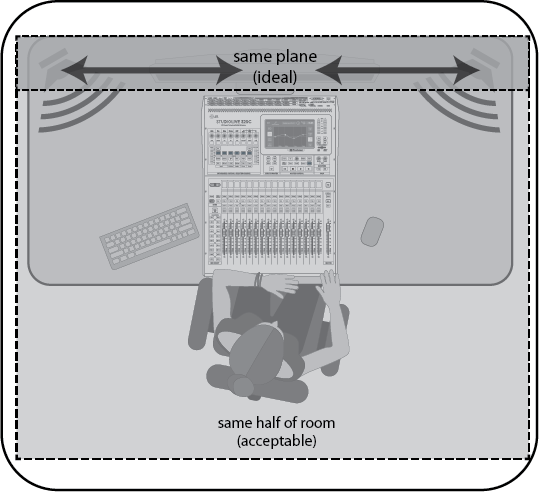 A quick way to find the best location for your subwoofer is to temporarily place it in the mix position and play some program material that contains a lot of bass. Move around the half of the room where your full-range monitors are positioned until you find the spot where the bass sounds best, focusing on areas that on the same plane as your studio monitors. Again, it’s important to remember that low frequencies are not directional, so placing the subwoofer beside you will not be an issue. However, try to keep your subwoofer on the same plane as your full-range monitors. This will help to minimize phase issues.
In general, you will want to avoid placing your subwoofer too near to reflective surfaces, like a wall or in a corner, as this will exaggerate the bass energy and make your monitor system sound “boomy.” But every room is different, and some subwoofers perform just fine near a wall, so use your ears rather than your eyes.
Once you find the place in the room where the bass sounds the smoothest, place your subwoofer in that spot, return to the mix position, and listen again. You may need to adjust the location; just keep making small adjustment (a foot or so at a time) until the bass response sounds as even as possible. Don’t locate your subwoofer where it will exaggerate frequencies, as this will have the opposite effect on your mix. For example, if your system has a bump around 100 Hz, what you hear will not accurately reflect what is in your mixes, so that massive kick-drum punch you hear in your mix environment won’t be there when you listen in your car.